
How-To Make Val’s Lego Cake
My foray into complicated birthday cakes started last year, when my son asked for a Minecraft cake for his 6th birthday. Not knowing really where to start, but never backing down from a challenge – I went to the one place every mom goes for crafty inspiration – Pinterest.
After looking at more Minecraft cake variations than I thought possible, I settled on a design idea in my head, and it turned out pretty well. Here’s a pic of last year’s cake:
Knowing that I had a reputation to uphold, I confidently stated “Well, SURE,” to my son again this year when he asked for a Lego cake for his 7th birthday.
I had no idea what I had just signed up for.
The sheer amount of Lego-related deserts on Pinterest is dizzying. After reading through one tutorial after another, thinking “oh this is way, way too complicated. Fondant? How about Fon-DON’T.”
I thought my best path would be to freehand a design and watch approximately 247 YouTube videos on how to make each component of this potential cake disaster.
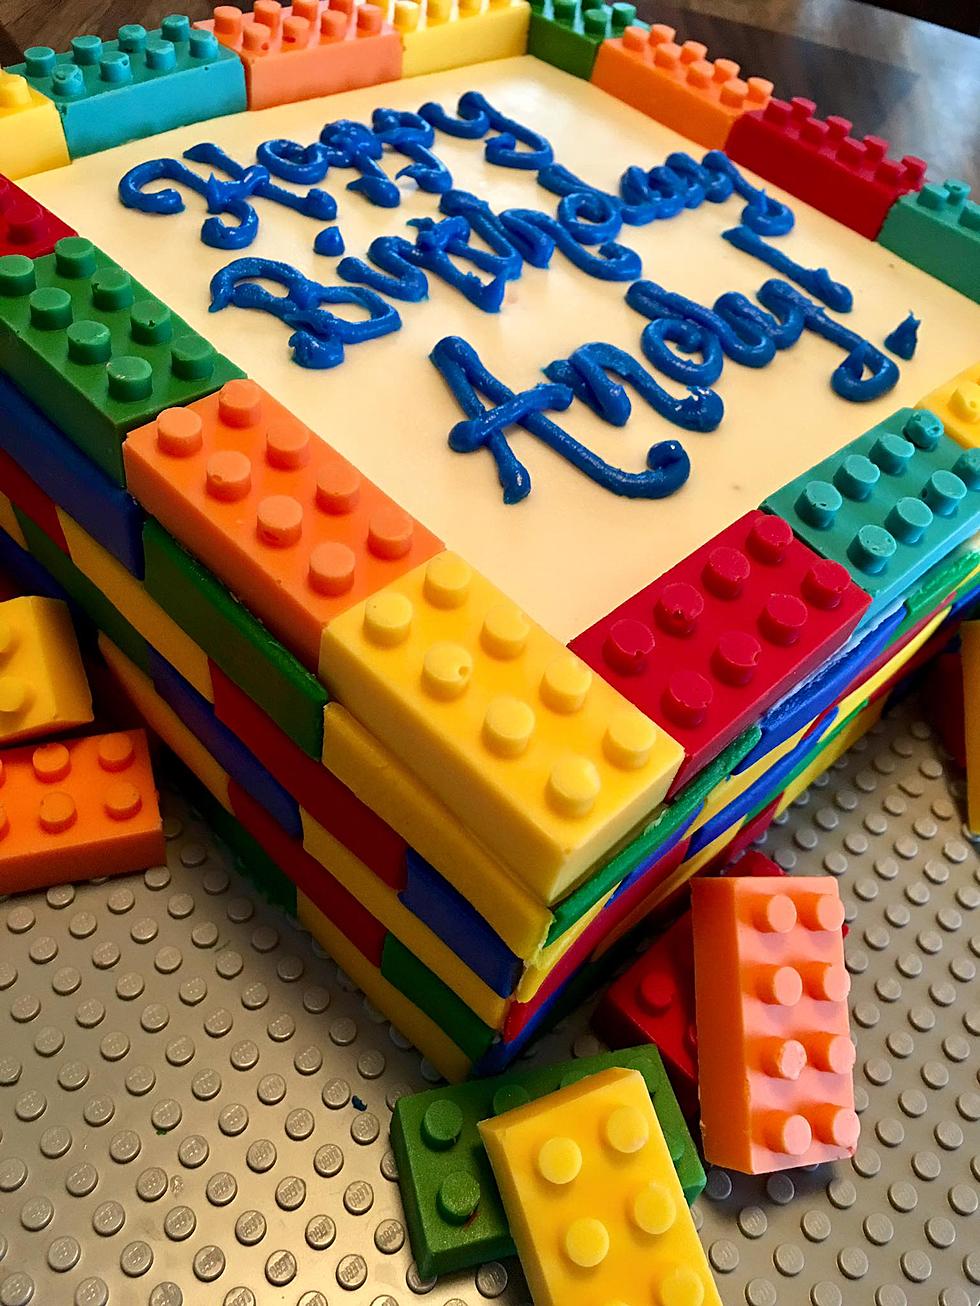
I’m happy to report, the cake turned out AMAZING.
If you’d like to make my Lego cake, I’ve put together a guide for you, hopefully saving you all the time in researching the best “carve-able cake recipe,” (and yes, these things exist).
If you’re smart, you’ll begin making the chocolate Lego bricks and fondant sides a week in advance. I would not recommend starting four days before and expecting to retain your sanity until party time, like I did.
I used this mold to make the Lego bricks, and used different colored chocolate candy melts to have a variety of color on the cake.
Best tip here – if your chocolate is too thick when melting, add some vegetable shortening while you’re melting it, and it’ll thin out. Also, use a toothpick to swirl the chocolate into the little nubs of the mold (to ensure a great shape) before putting in the freezer to set.
Now onto the fondant…I used the prepackaged stuff, because who’s got time for making your own? Roll it out to 1/8” thickness, and do NOT use one of those little plastic roller cutters. If you have one, throw it right into the trash, and grab an Exacto knife instead.
I cut the pieces and laid them on to a cookie sheet lined with parchment paper, and set out (uncovered) to harden.
If I were to do this cake again, I would have rolled out the fondant to the width of the bricks, and waited until it was much harder to slice into strips with the blade. When I had to trim some of the already dried pieces, it was *so* much easier to cut and keep its shape, versus cutting them all when still bendable.
For the actual cake, I used this recipe from Cake Central. Knowing I was going to use chocolate ganache instead of buttercream as the frosting, and knowing it had to hold up the weight of the chocolate bricks and fondant sides, I wanted a really dense cake that would cut up well.
After baking, letting it cool, and transferring to a cake board, I stacked my layers and trimmed around the cake – getting it ready for the ganache covering. I used white chocolate ganache, and was so glad I researched a recipe, because the ratios of chocolate to cream are way different when using regular semi-sweet chips. Every amazing tip on trimming and glazing the cake came from these videos:
Then it was time to decorate! I brushed vegetable shortening on the sides of the cake, and on the back of the pieces of fondant. This let me slide the pieces around to fit together, without ripping off any of the ganache underneath. Very, very forgiving.
After an entire episode of Criminal Minds, the sides were complete, and it was time to place the bricks. To make sure they adhered to the ganache on top, I dabbed some ganache underneath each brick to make them sit well. Be careful to work quickly with the ganache and the bricks, because the bricks started to melt in my hands as I was arranging them – no one likes dented chocolate with tell-tale fingerprints imprinted on the sides.
I used one of my son’s actual Lego base boards for the cake, with another cake board underneath to give some support for when I would need to move it. This wound up being a very heavy cake! I finished off the cake by arranging piles of the leftover chocolate Lego bricks around the base, and adding in Lego candles.
More From The New 96.1 WTSS